Wednesday, May 25, 2011
Card
 | |
| This all I did was toke a plain black square and added the text and the custom text and then softened the edges so they were rounded and then i turned it to give a 3D effect and then I added the drop shadow to finish it. |
Making A Stamp
 |
| This is the final result. What I did was I toke the picture and put extra white around it I also to give it something to stand out i toke a picture of a flag and put it over it and faded and then used this funky tool on photoshop that punches out holes on the outside and then I just added some text to give it the final touch. |
Tuesday, May 24, 2011
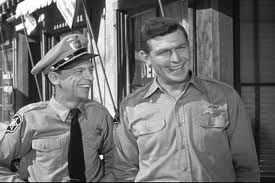
Colorising
 |
| GO JOHN WAYNE!!! Any who so to do this I toke and put the picture on another layer so there was 2 of them then I just toke the color from the one layer and added a layer mask and started to brush the copy layer to revel the color of the first one. |
Tinting
 |
| This I used photoshops tenting feature by using suture and hue and it just so happen that it gave me purple and green so lucky me. |
Adding Shadow
 |
Window
 |
| First I toke the picture of the beach in the back ground then I used the square tool and then added a circle above it and it all turns into one shape and then I found a pic I wanted on the inside and coped it and then pasted it inside the window shape then just added some text and then photo shop has a tool to add a sun shape that i used and ya....that's about it. |
Monday, May 23, 2011
Luxury
 |
| This ad is actually based around the word "luxury" that you can barley see (I guess that means I did it right???) any how all I did was add the picture and then added the word luxury and rotated it to the side and lowered the opacity and then I added the paragraph of text and the actually company logo and another picture and to give it a nice look I added a stroke around the outside of each picture and the hole ad itself. |
Poloroid
 |
| Well first I made a new document the size of a standered piece of US paper. Then I toke the center picture and put that in first and put a white stroke around it and added a light shadow. Then I just added more pictures then did the same thing with the stroke and shadow. then to make it look like some are on top of others I just moved them on the layers palate. Then I just added text to give it the final touch. |
Friday, May 20, 2011
Reflection
 |
| With this all I did was take the picture and duplicate it. then reversed it and turned both sideways. then made the bottom one fade . Then just added some text to give it a poster look. |
Monday, May 16, 2011
Poloroid Pictures
 |
| Ok this is one of my favorite projects iv done. Well first I made a new document the size of a standered piece of US paper. Then since I knew what I was gonna do I found a picture of old paper I toke that and spread it to cover the hole document. Then I toke the center picture and put that in firs and put a white stroke around it and added a light shadow. Then I just added more pictures then did the same thing with the stroke and shadow. then to make it look like some are on top of others I just moved them on the layers palate. Then I just added text to give it the final touch. |
Blending Images
 |
| I toke a blank document that was the size of a stander piece of US paper. So first I toke the main picture of Eli or the man in the green jacket and placed it in the spot I figured would be the center of attention. Then I added the other 3 pictures and toke and put a layer mask on all of them. Then just started to fade the edges so non were perfect squares and then I just started to fade around the main point of each picture. Then to give it the final ad look I added the text and the black border around it. |
Flipping Text
 | |
| Well this one I just toke a blank document and wrote my name on it first then I typed my name on that layer and turned it red and then toke that layer and duplicated it and flipped it upside down and turned that blue then I hide thoughts layers and used the gradient tool to give the red to purple to blue effect. |
Wednesday, May 11, 2011
Polished Metal
 |
 |
 | |
| This is the final ad. The top of the ad is the picture to the left. the real thing to notice is the polished metal that the bold and dark text. First I put a rectangle on the added and used the texture feature to give the rectangle the polished metal look. I just tuned down the darkness of the metal. Then to give it the final touch I added the small text and the computer monitor. |
Cell phone ad.
 |
| This was the cell phone I used in the ad. |
 |
| This is the final ad. Note the picture in the back of the top ad. The picture in the phone screen I lassoed it and brought it to the new document and made it larger to cover the hole ad. Then I toke the color out of it and lowered the opacity then I added the orange circle so that the main text sticks out more. Then I added the logo on the side and then to make it look like a real ad I added the small print on the bottom. Then I added the main ad the 39.95 a month so it looks like a real ad. |
Pop Can
 |
| This is the picture I used as my template. |
 |
| This is the final project. First I toke the can and I pt a selection around the label and added the texture witch is by complete accident I went to add a texture and just kept messing with it till I got something that looked cool on a pop can. Then to give it the final touch and the text. |
Tuesday, May 10, 2011
Putting a image behind words.
 |
| This is the pic I will put the text over. |
 |
| This is after I wrote what I wanted to be over the image so then I toke the words and encircled it so then I deleted it so u can see the image behind it. |
Placing the image in a image
| This is the image I put my logo on. |
 |
| This is my logo. |
 |
| This is the final product. All I did was toke and put the image over the billboard and adjusted it so it looked like it was actually on there and not just over the pic. |
Putting a image behind words.
 | |
| This is the image im going to put behind the text |
 |
| This is after I wrote what I wanted to be over the image so then I toke the words and encircled it so then I deleted it so u can see the image behind it. |
Placing the image in a image

 |
| First I opened the image i wanted as my base or what the other image would go in. |
 |
Then I toke the picture and I cropped it to roughly the size of the monitor screen and then warped it to bend to the curve of the screen and then lowered the opacity so it didn't look like it was just put over it. |
Monday, May 9, 2011
Placing the image in a image

Then I toke the picture and I cropped it to roughly the size of the tv screen and then warped it to bend to the curve of the screen and then lowered the opacity so it didn't look like it was just put over it.

Motion


Wrap Text

I wanted to be around it and curved it. Then duplicated it
and turned it the opposite way and moved the text so it
in circled the planet.Then I put them on there own layer
and rastilized them so they were 1 picture. Then I warped
it so it was around the planet slightly sideways, and then erased the part that would be around the back of the planet.

Friday, May 6, 2011
Making A Stamp


What I did was resize and cropped i to a usable
size then i put it on a whit back ground by
adding a larger canvas and then used
photoshop's eraser to give it the stamp
outer edge and then added text to give it
the final touch.
Adding Shadow

of it and blacked it out then lowered the
opacity and rotated to the "ground".

Poping an Image

 What I did was lasso the part i wanted to keep in this case the people then put them on there own layer and deleted the rest of the background i didn't want and to finish it off I put a border on it and added so text.
Subscribe to:
Comments (Atom)